This is a blog series to learn the Sitecore SPEAK for beginners.
So far we have played with Sitecore command & opening the dialog from Sitecore ribbon,if you missed that here is the link.
Let do SPEAK now :-).
As you may already know, but if you don’t here it is:
SPEAK stands for Sitecore Process Enablement & Accelerator Kit.
It is a technology to build rich & interactive UI component for Sitecore using famous java script frameworks such as knockout.js & backbone.js combined with the power of Sitecore’s Item Web API.
SPEAK is a replacement of old Sheer UI.
To work with SPEAK one would need the Sitecore Rocks installed.
Sitecore Rocks is a Visual Studio plugin to play with Sitecore websites well within Visual Studio.
To get more informatiom about Sitecore Rocks follow these links:
http://www.sitecore.net/learn/blogs/technical-blogs/john-west-sitecore-blog/posts/2011/07/sitecore-differentiating-factors-blog-series-sitecore-rocks.aspx
http://www.sitecore.net/learn/blogs/technical-blogs/trevor-campbell.aspx
Ok let’s focus on the SPEAK again.
I always believe that to learn something as a beginner, we should have a solid outcome of all that learning.
We should always have a feeling that we are building something & that makes us more focused on the learning.
So in the end of this blog series ,we should have something useful with all our learning applied to it.
What it would be?
We will be building a SPEAK app which does something useful with ease of learning.
So I thought to build an app (SPEAK app :-)) & this is how it will look like:
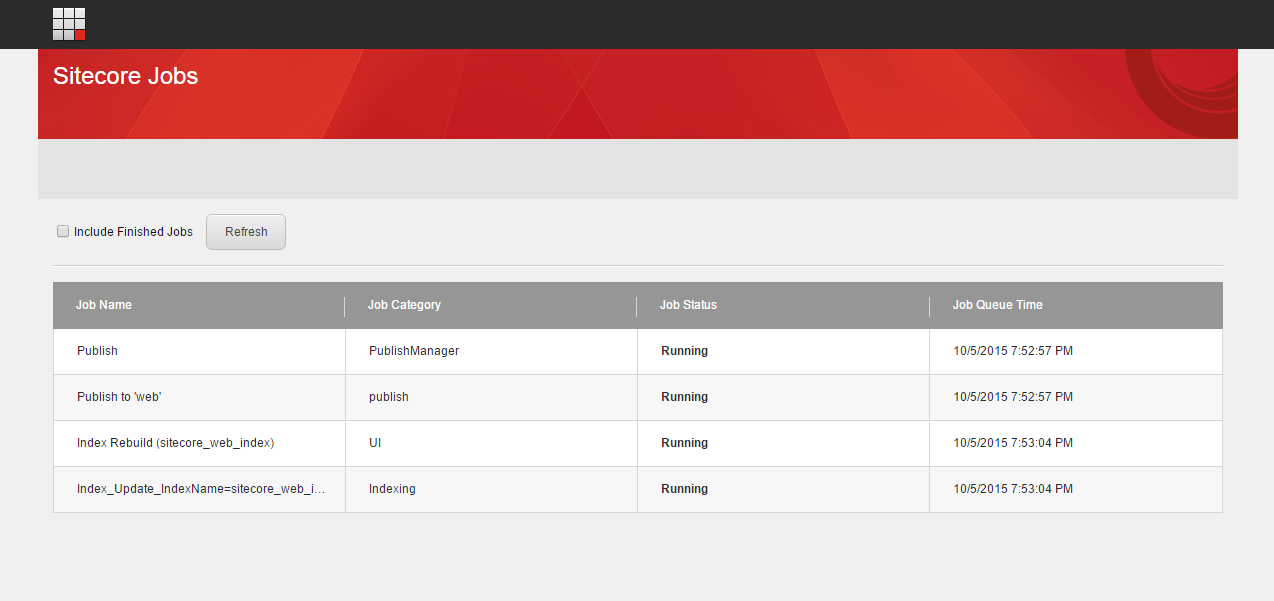
It’s an app to list all Sitecore jobs so user can monitor which jobs are running or queued or have finished.
Alright time to get started:
Let’s create the SPEAK application:
Open the Visual Studio & Open the connection to the Sitecore website in Sitecore Rocks.
Expand the ‘Core‘ node & navigate to the ‘/sitecore/client/‘ folder.
As a best practice follower,I’ll create our SPEAK application under :
‘/sitecore/client/Your Apps‘ folder.

I’ll now go ahead & create a folder for our SPEAK application & name it “ViewSitecoreJobs“.
Hope this name makes sense :-).
Alright now we are ready to build page for our SPEAK app.
SPEAK applications may contain 3 types of pages:
-Dashboard page
-List page
-Task page
We will learn more about these later.
Since our application will list Sitecore jobs, let’s use the ListPage type.
To add the ListPage to our application follow below steps:
Right-click on the “ViewSitecoreJobs” folder & select the New Item option from Add menu or you can simple use CTRL+A to add the new item.

Now type ListPage in the search bar & you can see results in the below area are filtered :
Select the branch template of ListPage from below path:
/sitecore/client/Business Component Library/Templates/Branches/Applications/ListPage

let’s name the page ‘SitecoreJobsListing’ & click OK,this is what we got:

Our folder now has the SitecoreJobsListing item(of ListPage type),since we used the branch template it also created the PageSettings item beneath it.
I’ll come later to explain what PageSettings is used for.
For now let’s think this SitecoreJobsListing item as any other Sitecore Item which has some presentation components assigned such as header & footer components as well as the main Layout .
Before we have a look what presentation components we have on this item,let’s just run this page(or let’s run our app :-P).
To do that simply copy the path of the SitecoreJobsListing item & open a new tab in browser & type the website’s base address & paste the copied path.
This should look like something like:

If you see above page,congrats we just created our first SPEAK page.
In next post we will look the presentation details of this page & will also learn how we can render data on these components(renderings).
Sitecore SPEAK For Beginners blog series:
In part 1 Create SPEAK Application.
In part 2 SPEAK Components.
In part 3 Rendering Parameters.
In part 4 Getting Data.
In part 5 Display The Data.
In part 6 Custom SPEAK Component.
In part 7 Rendering Parameters for Custom Component
In part 8 Initialize & Bind Rending Parameter Using Knockout.js
In part 9 Getting Data For Custom SPEAK Component.
If you any question/suggestion, please write in comments.
You can also connect with me on Twitter.
